Wil Stacey

Tiny Room Constuction
This project is the second part of my tiny room conception assignment. It consists of creating the room which we have planned during the tiny room conception, producing models, lighting, textures, a production log and our final tiny room within unreal engine 4.
Time management

This is a Gantt chart I have produced to track my time usage for this current project. It will be updated and altered if needed but should prove to be an effective use of my time within each section of the assignment.
I will be modelling for the first 3 weeks of the project as well as producing a production log alongside, my target is to finish the modelling and production log within these 3 weeks but time may need to be borrowed from the week of interactions to ensure all the modelling is completed as this is my main focus of the project and is the reason the most time has been allocated to it.
Production log
Katana + stand
For my first model, I had already created a katana for a past project we had been working on so all I would need to do Is create a mount for my katana. I started by determining the dimensions for the stand based on the size of the katana. Then, through the use of my reference images on the conception document I produced earlier, I began modelling the stand using primarily the extrude and bevel tool.
When it came to texturing the stand I wasn’t pleased with having a completely wooden stand and decided to add a symbol to the centre to implement more detail into the model. I did this by using the bevel and emboss blending in photoshop with the colour white to make It stand out.

I then took the textured katana and positioned it with the stand for the final piece.

Bar
For the bar, I wanted a bar that was more exciting than just being one solid block so I added some divider blocks and an underlayer which I would later texture to create a wider sense of dimension and make this crucial model within the room stand out more.
Even with such a basic model, I think I have done a good job in the creation of the bar and achieved success in creating a realistic-looking, original model.
I mainly used the extrude tool and duplicate in the creation of this model.


Drinks stand
This basic model was quickly created in order to fill in the blank wall space as well as holding the drink models which will be added later.
The tools used on this model was primarily extrude, multi-cut and bevel.

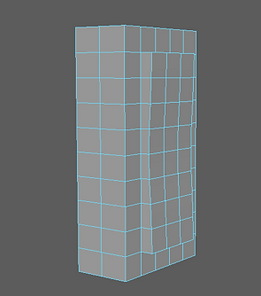
Divider
Following my reference images closely, I wanted to keep true to the Japanese interior which involved creating this accurate wall piece.
For this model, I used duplicate in conjunction with the grid snap feature in order to create equal square divisions.

Table
For my table model, I wanted to create a table that wasn’t just a simple basic rigid shape and had more character to it, keeping to the traditional Japanese theme. I think I have done well in capturing this theme as well as adding my own spin on it with the cross-sections.
On this model, I used a wider range of tools and features: extrude, boolean difference, bridge and bevel.


Pillow
For the pillow, I taught myself how to use the n cloth within Maya by watching some youtube videos. I converted the shape into an n cloth and set the gravity to 0 on nucleus1 so that the model wouldn’t fall once I clicked play. I then increased the pressure slightly which inflated the shape into a pillow-like object.

After I had got the overall basic shape I selected the 2 outer edges and bevelled them in order to create a smoother rim. Finally, I smoothened the model and applied its textures aswell as creating the UV.

In order to keep to the theme of my room and make the pillows stand out a bit more, I used a red fabric texture on them which I altered in photoshop with the use of the clone stamp tool. I also added a base for the table and pillows to be elevated upon.

Stone light
For this model, the process was a little more complicated. I began with a basic shape of how I wanted the light to look and using that I further developed the light until it started to take shape.
I used a lot of tools for this model including bevel, extrude, circularize and boolean difference.
For the texturing of this model I wanted it to be completely stone as well as implementing a small decal with Japanese lettering. I also like the way the stone has turned out because it has a good looking tone variation.


Barstool
Much like the table, I didn’t want this model to look rigid and boring which is why I have added features such as the pillow, footrest and slight bend to the seat and legs.
To create this model I used bevel and extrude.
To ensure each model fits within the room and work well with each other I frequently use the same textures for different models. This is demonstrated within this model as I have used the same wood from the bar and the same fabric texture as the one I used on the pillow.


Door
For my door, I wanted a modern-looking piece that didn’t stand out too much but still looked good. I achieved this by using the wood and pillow texture I had used on the seat and bar to ensure the door fit the room.
To create this door I used the extrude tool. I also used the clone stamp tool within photoshop to get rid of any inconsistencies within the fabric for a cleaner look.

Lantern
This is a very simple model I made by adding a sphere and reducing its poly count to make it look more lantern-like, I then added the 2 rings at the top and bottom and finally textured the model.
To create this model I used clone on the ring.


Floor
The floor was very simply made as all I had to do was create a 5m x 5m x 0.1m rectangle and texture it. I did it this way to ensure the texture lined up well and looked the way I wanted it to on the model.
A seamless texture was put together in photoshop to create this material.

Menu + stand
As suggested by my feedback (last page) I needed to add smaller models in order to bring more detail to the scene and to fill the empty space. I decided to implement a menu that was on an art stand for a unique feature within my bar.
I created this stand and menu using the extrude, bridge and combine tool.
I decided to create my menu paper by taking an existing Japanese menu and adding some traditional Japanese line art to it. This model is also interactable which I will discuss later in the document.

Canvases
In addition to the menu filling empty space, the walls of the bar also appeared quite boring and blank, which led to me creating these 2 canvases.
The models themselves are very basic as the textures do all the work. I decided to texture the canvases with 2 traditional Japanese art pieces which I believe fit the room very nicely.

Scroll
I also felt the bar needed something to fill out its empty space so I added hanging scrolls which I spoke about within my conception.
This model is also very basic as the texturing is doing all the work.


Light switch
For my final interaction, I wanted the player to have access to a light switch to change the lights within the room so I modelled a basic light switch using primarily extrude. If given more time on this project I would also have implemented an animation for the light switch to turn off and on but as I have run out of time and in the isometric view it would be barely visible I decided against it.


Interactions


This interaction allows the player to turn the light on and off once next to it through the use of a box collision. UI is also displayed detailing which button to press and what the interaction does.


This interaction displays the menu on screen to the player once they pass by the menu in the centre of the room. It does this using a box collision and UI elements.


This interaction displays info about the katana once the player steps inside the box collision.
I created each UI feature in photoshop and implemented them into unreal with the image feature on the UI widget blueprint.


Logo


I was also asked to implement a logo into my UI, I created 3 logos in photoshop and asked my tutors, family and friends which they liked best and the overall answer was the one below which is what I went with.

Additional information

To create atmosphere in my scene I messed around with the atmospheric fog until I was happy with my the final product, which I thought gave a nice effect to the room.
As discussed in my conception I wanted the stone lights to give off an orange/yellow light which gave a warm feel to the room which I have implemented through the use of a bright point light.


Feedback
Noah Bellamy – GS20-4
Feedback – “The room needs additional smaller details, so it looks more like a bar.”
Response - I have added the additional menus, canvases, and scrolls.
Feedback – “Your document so far is well structured and makes it easy to understand the process that you have taken in order to complete each of the models.”
Jack Broster – A-Level Student
Feedback – “The colour and texture choices throughout the room reflect the intended style and the pop-up info for the Katana is very nicely styled without causing a break to this immersion. However, even though the atmospheric fog will add a nice effect to the overall appearance of the room, it may be worth having a source for this such as a "traditional Japanese incense burner" as this may allow you to vary the intensity as you move around the room to develop the effect even more.”
Response – I will take this into consideration for future projects.
Silas Bovaird – GS20-4
Feedback – “With the light sources you could make the contrast more intense between the light and dark just to really define the atmosphere.”
Response – I have changed up the lighting slightly and adjusted the fog to add more definition to the light vs dark.
Feedback – “I like the additions of the smaller details, it makes it more authentic”
Evaluation
I believe I tackled this project well, coming up with a strong original theme and executing it to the best of my ability. As with most projects, there is always room for improvement and that certainly withstands for this project. If given the opportunity to tackle this project again or if more time was allocated to improving this project I would firstly perfect the lighting and atmosphere of the room so that it works best within the isometric view as I found some issues whilst working in that view (models appearing squished, lighting breaking, models appearing distorted). I would also add some more additional features such as particle effects, music and animations.
I'd say that the tiny room I have created is fit for purpose as it caters to the brief and the surveys I performed. I would also say that it fit my original intentions well as It doesn't differ too much from its original planning and I am pleased with its end result. As a final improvement, I would also alter the layout or sizing of certain models to allow more movement within my room and so that the interactive models can be accessed easier.